


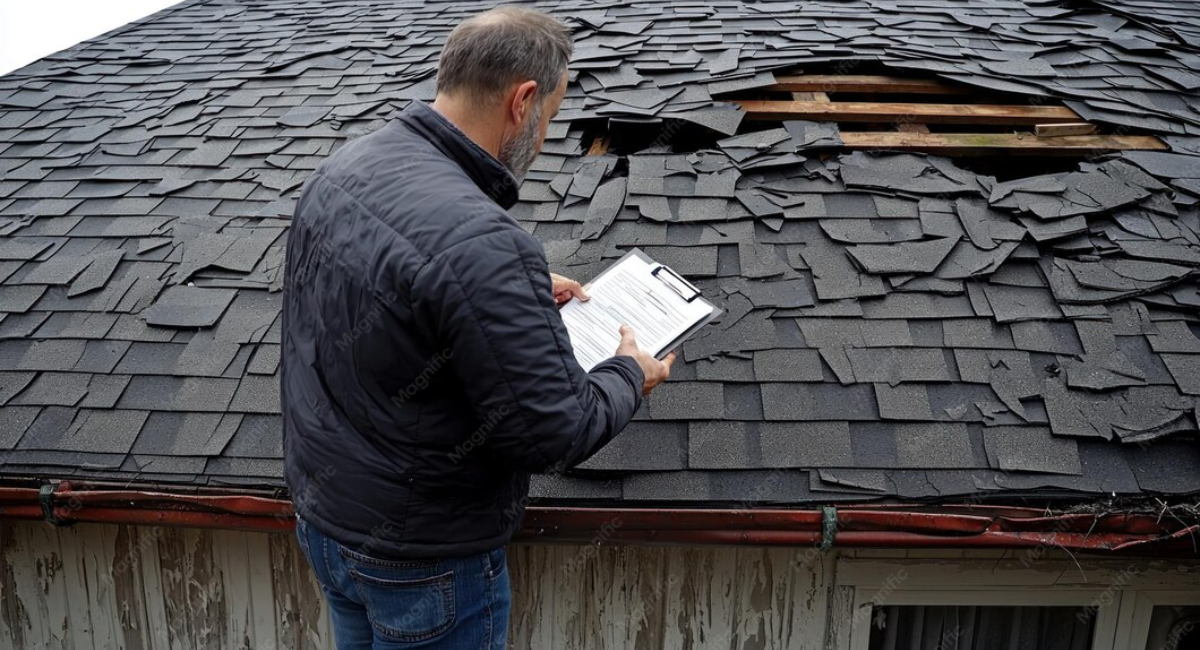
Have you ever witnessed a storm passing by and asked yourself, “Is my roof okay?”
This blog provides an answer and presents you with a practical list of things to do when inspecting your roof after a storm.
In this blog you will find out what you should be looking at from the ground level, what you should check in detail, what you should take care of inside the house, and what next steps you should take to secure your home.
Strong Signs to Watch For
- Missing or curling shingles, portions of the roof that appear to be exposed or where the shingles raise at the corners.
- Dents or granules, small, circular dents or granules in the gutters and downspouts indicate hail damage.
- Water stains on ceilings or walls, brownish or darker stains inside indicate that the leak has begun.
- Sagging roof lines or soft spots, spots that appear uneven or spring up when stepped upon.
- Damaged flashing, vents, or chimneys, the metal pieces surrounding the roof components can be damaged or torn.
Safety First: How to Inspect Safely
- Never go on top of the roof if it is either wet or unsafe; use binoculars from the yard or a window at the second floor to examine it.
- Inspect the roof’s edges and only go up using a ladder when someone holds its bottom; wear rubber-soled footwear and never inspect a roof alone.
- Should there be any significant issues with the roof’s structure (big sagging, missing parts, large debris), then stop and hire professionals.
Step-by-Step Exterior Checklist (Ground & Ladder)
- Walk around the yard: observe any fallen branches, loose shingles, or other roof-related debris.
- Inspect gutters and downspouts: check for signs such as granule loss, dents, and clogs caused by roof damage.
- Observe the shingles: missing, cracked, uplifted, and blistered shingles are evidence of roof damage from the wind or hail.
- Inspect the flashing and seals: check for tears or separation at points where the roof meets chimneys, vents, valleys, and skylights.
- Check the roof edges: damaged drip edge and fascia may allow water to get behind the roofline.
Interior Checks That Reveal Hidden Damage
Attic inspection: look for damp insulation, dark marks, or light coming through the roof sheathing.
Ceiling and closet: inspect for stains, peeling paint, or blistering which you did not notice previously.
Moldy smell or mustiness: it indicates trapped moisture due to some leak.
Electrical fixtures: staining around lights may indicate leakage into electrical wiring.
How to Document Damage (Do This Right Away)
- Photograph clearly from various angles: wide shots to establish context and close shots for any damage.
- Stamp photos with date and sort according to areas (roof, gutters, attic, interior).
- Prepare an inventory of the issues you see and date the storm occurrence.
- Keep copies of all receipts for immediate repairs (tarps, etc.) as they can be reimbursed.
When to Contact Your Insurance Company
- Contact your insurance company immediately in case of structural damage, leaks or costly repairs.
- Provide them with your pictures and written comments; ask for assistance in filing your claim and meeting with the adjuster.
- Do not agree on any repairs or receive a final offer from the contractors before contacting your insurance company.
Choosing a Roofing Contractor
- Make sure your roofing contractor is licensed, insured, and has good local reviews; don’t deal with anyone who tries to get you to sign right away.
- Request an estimate, list of services, and time frame in writing before any work begins.
- Compare estimates from at least two different contractors by checking references or pictures of previous work.
- Make sure any warranty is in writing.
Quick Temporary Fixes You Can Do
- Use a thick tarpaulin sheet to cover the leakages that can be fastened with the help of battens or sandbags, if possible.
- Remove all the debris from the gutter system so that water can be channeled away from the roof.
- Move all valuable items away from the area where leakage is taking place and keep buckets to collect dripping water.
Preventive Steps for the Future
- Cut back overhanging branches and prune dead wood to avoid injury risks.
- Clean your gutters twice per year to keep water from backing up and forming ice dams.
- Have a professional examine your roof once or twice per year, especially after storms.
- Impact-resistant shingles may be an option for older roofs or those at high risk.
Common Mistakes to Avoid
- Do not postpone repairs because minor leaks can develop into serious and costly issues fast.
- Do not walk on an area of your roof that appears to be sagging or lacking structural integrity.
Final Thought
A fast and thorough inspection of your roof following a storm will save you time, money, and hassle by catching any issues before they become bigger problems. Follow this guide to inspect your roof following any storms, record what you find, and call a pro if needed.
FAQs
1. When should I be inspecting my roof after a storm?
You should be inspecting your roof after 24 to 72 hours after the storm since that is when you will find any leakages or damages.
2. Is it safe for me to go up on my roof and look for signs of damage?
If there are no leaks or structural issues in your roof, then you can safely go up and look around using binoculars.
3. Will I be covered by my home insurance for storm roof repair?
It depends on your insurance company since some do not cover storm damages. You will have to check with them first.
4. Should I accept an offer from a contractor who says he can repair my roof immediately?
You need to get that offer in writing and ask your insurance company what they think about it.
5. How do I know whether the damage is only cosmetic or I need to replace my roof?
It depends on the inspection that will be done by a licensed roofer.